Friday, August 27, 2010

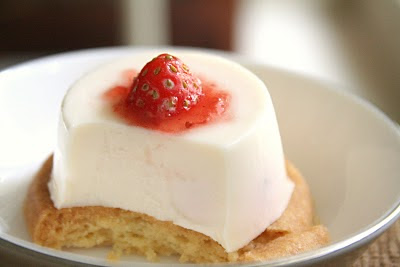
Strawberry Panna Cotta


I never thought Panna Cotta was this easy! Make this because my boss's request, for his anniversary. And I called this Project Strawberry and Cream. Not only the main ingredients are strawberry and cream (of course,duuh~), but the color too. I made a packaging box for this panna cotta, but i completely forgot to take pictures *sighh* The packaging was so cute, combination between tartan and polka dot pattern, with the bright red and cream color (try to imagine, i can't give you pictures).

And for better, I based the panna cotta with vanilla shortbread. So it'll give more texture, the bouncy creamy panna cotta with soft-crunch shortbread. I tried it with hazelnut shortbread before, but the hazelnut came out too strong and defeated the panna cotta's flavor. We're back to basic!

I browse a lot of recipes before i came out with this one, David Lebovitz, with a little adaption, since I use strawberry instead of vanilla flavor.


Strawberry Panna Cotta

For Panna Cotta :
4 cups (1l) heavy cream (or half-and-half)
1/2 cup (100g) sugar
2 teaspoons of vanilla extract, or 1 vanilla bean, split lengthwise
2 packets powdered gelatin (about 4 1/2 teaspoons)
6 tablespoons (90ml) cold water
strawberry, cut into little pieces, use as much as you need

For Buttercream :
60 gr unsalted butter
1/3 cup (about 75gr) icing sugar
1 tsp vanilla essence - I recommend to use good quality vanilla essence, this basic thing need an extravagant taste.


1. Heat the heavy cream and sugar in a saucepan or microwave. Once the sugar is dissolved, remove from heat and stir in the vanilla extract.

(If using a vanilla bean, scrape the seeds from the bean into the cream and add the bean pod. Cover, and let infuse for 30 minutes. Remove the bean then rewarm the mixture before continuing.)

2. Lightly oil eight custard cups with a neutral-tasting oil.

3. Sprinkle the gelatin over the cold water in a medium-sized bowl and let stand 5 to 10 minutes. Add the strawberries into cream mixture.

4. Pour the very warm Panna Cotta mixture over the gelatin and stir until the gelatin is completely dissolved.

5. Divide the Panna Cotta mixture into the prepared cups, then chill them until firm, which will take at least two hours.

If you’re pressed for time, pour the Panna Cotta mixture into wine goblets so you can serve them in the glasses, without unmolding.

6. Run a sharp knife around the edge of each Panna Cotta and unmold each onto a serving plate, and garnish as desired.

To make Panna Cotta with sheet gelatin: Soften 25g (approximately six sheets) in a liter of cold water for 5 to 10 minutes. Wring the sheets out and stir them into the warm Panna Cotta mixture in step # 4, until dissolved.

I made the mini version of this.


here's the link for you to learn more about gelatin http://www.davidlebovitz.com/2009/04/how-to-use-gelatin/


Almond Biscotti


I've tried a lot of biscotti before i decided to bake one. I have to make sure the perfect texture, the taste, and the flavor. After starbucks, coffee bean, bengawan solo, and cheese cake factory, the winner is Coffee Bean! They got the right texture, i love the flavor : Almond, but i should omit the berry thing.

So, here I present to you, my first Biscotti :


Almond Biscotti
from http://cookalmostanything.blogspot.com/2006/05/almond-biscotti.html

300g plain flour
200g caster sugar
1 teaspoon baking powder
3 eggs
2 teaspoon vanilla extract
100g whole blanched almonds

Preheat oven to 160°C/320°F.

Sift the flour, sugar and baking powder into a bowl.

Whisk the eggs with the vanilla extract, then stir into the dry ingredients. Add the almonds, then turn out onto a lightly floured bench.

The dough should be soft but able to be moulded into shape. I found the mix to be too sticky so I had to add a fair bit of flour until it achieved the appropriate consistency. As all flours are different, this is just something you need to keep an eye on when baking.

Divide the dough into two and shape each into flat logs about 25cm (10 inches) by 5cm (2 inches) in size. Place on baking paper and onto oven trays. These will spread out so leave plenty of space or put them on two trays.

Bake for about 35 minutes or until they are lightly browned.

Remove and let cool slightly.


Using a serrated knife slice evenly - about 1cm or thinner.


Place the slices back on the trays (cut side down) and return to the oven - cook for 10 minutes, then turn them over and cook for another 10. You are looking for the slices to dry out but barely colour - if you press a finger into the cut surface there should be resistance.


When done, place them on a wire rack to cool. Store in an airtight container - these should keep for a few weeks

Best thing to do in the morning : dunk the biscotti to your coffee!